Welcome to Hitty Bee’s Classroom! Doll Painting 1 with Hitty Anne is the first in my brand new series of step-by-step doll painting tutorials here at Busy Bee Academy. A picture is worth a thousand words, so much of the content of these series will be detailed photographs of my dolls in the painting process. I’ll share my tips and tricks as we go along, and you can learn all about my paints, brushes, and other painting supplies in Hitty Bee’s Paints and Supplies.
Today I’m starting with Hitty Anne, our Hitty Girls Souvenir Model for 2015/2016. Hitty Anne has a flat eyespace, but sculpted lips, which affects our approach to both of these features. On the first three tutorials, using Hitty Anne models, I’ll demonstrate the style of features I use most often on my own dolls. Watch for more photo series to come, where I’ll show how to paint various resin models with a wide range of features and techniques that you can adapt to paint a face on any doll.

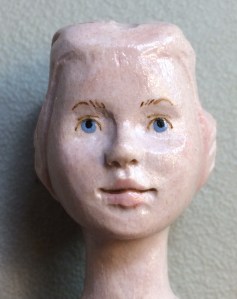
1: Blue: I usually start by painting the iris, or colored part of the eye. If you were painting a doll with sculpted eyes, or wanted a clearly defined sclera, (white of the eye), then you could begin with white. I will show that technique in later tutorials.
It is useful to mark a tiny pencil dot in the center of where you want to place the iris. You can turn the doll upside down, or look at her in the mirror to see if your eye placement is even, but don’t worry about perfection. Human faces are always a little asymmetrical, as are most dolls.

2: Black: Next, paint the pupils, the black center part of the eye. Paint the pupil so it touches or nearly touches the top of the iris. The color of the iris does not show above the pupil in most of our eyes most of the time.
If the pupil is placed in the exact center of the iris at this stage, you may end up with a doll who looks startled, or who looks as if her pupils are constricted, (small), as they would be in very bright light. Generally faces are perceived as more attractive when pupils are dilated, (large), as they would be in dim light. This indicates relaxation and positive emotion.

3: Pink: Now I add the lip and cheek color. I always use the same color for both, but I thin the color more for the cheeks. It’s nice to add a very light touch of the cheek color on the forehead or chin.
4: Brown: Next, it’s time to use brown to add some shading and contours in a natural color. I shaded her lip line and under her lower lip with diluted brown. Sometimes it looks nice to shade the nostrils a little with diluted brown, but it’s not necessary on this doll because her nostrils are well-defined.
Then I used the same brown, a little darker, and painted an eyeline, just over the top of the iris, and an eyelid line, (optional), above the eyeline. It’s a good idea to use a pencil, once again, to mark the location inner corner of the eyebrows. Turn her around and look in the mirror to see if they are they same height. I don’t usually pencil in the whole eyebrow, because it’s harder to cover a whole pencil line with paint.
It’s intuitive to start with the right eyebrow if you’re right handed, and the left if you’re left-handed. But you might get better results if you start on your non-dominant side. Paint the eyebrow that’s harder for you, and then try to match it on the side that’s easier.
Many people find they want to turn Hitty sideways or upside down to paint the ‘harder’ eyebrow, which makes it important to start with your ‘harder’ side. If you turn her sideways or upside down to paint your ‘harder’ eyebrow, then save your ‘easier’ one for last, you don’t have to try to match an upside-down eyebrow. It’s far easier to match the second eyebrow to the first if you’re looking at a right-side up face, due to our perception of features and expressions.
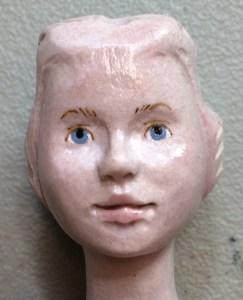
5: White: At this point, you can paint some very thinned-out white on either side of the iris, inside the eyeline, if you like. This method brightens Hitty’s eyes but still has a very soft look, building the shape of the eye around the iris.

6: Black and a little White: Use very thin black lines to add definition. You may wish to darken some or all of the eyeline, some or all of the eyebrow, or paint a thin ring around the outside of the iris. I don’t recommend using black on the mouth or on the eyelid line.
On this Hitty, I painted a black ring around her iris, but left her eyeline, lid line, and eyebrows in brown for a soft look. Last, I added a teensy white highlight in her eye. You can do one, two, or more teensy white glints. Just make sure they match on both sides! If they’re on the left, they should be on the left of both eyes. This is the one portion of the face where we don’t want one side to be a ‘mirror image’ of the other. The glints look best if placed in the pupil or on the edge of it. You can brighten eyes that look sleepy or too dark by placing the highlight toward the top.

7: Paint Hitty’s hair color by painting the hairline all the way around, and then filling in the back. I use the same black color for hair and boots. You’ll probably need to do two thin layers to get a thin but opaque layer of color, which will be more resistant to chipping than a single thick layer.
Last, if you like, add a couple of forehead curls!
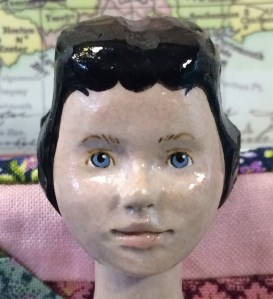
8: Make sure to seal your work with varnish. This is especially important on resin dolls to help the paint adhere.
Now Hitty is ready for her First Adventure!
